Showing posts with label hyper-v. Show all posts

Friday, 29 March 2019

Error 21201 SMBIOS GUID after installing SCVMM 2016 Update Release 6


I recently updated my SCVMM server to Update Release 6.  However once updated, I was getting error 21201  “Another machine with the same SMBIOS GUID is found. Recommended Action An SMBIOS GUID should uniquely identify the machine. Provide the correct value or contact the machine manufacturer to help update the hardware with correct information” as pictured below:

In my case, I think this was because I had removed a host from the cluster and then re-added it.


The fix was as follows:


Go to SQL Server Management Studio and connect to the VirtualManagerDB.  Then run the following query:

SELECT * FROM [VirtualManagerDB].[dbo].[tbl_ADHC_Host]


This should return a number of rows equal to the number of hosts in your environment.  Mine returned the following:


Next execute the query:


SELECT * FROM [VirtualManagerDB].[dbo].[tbl_PMM_PhysicalMachine]


In my case, this returned one more row than the number of hosts I had in the environment.
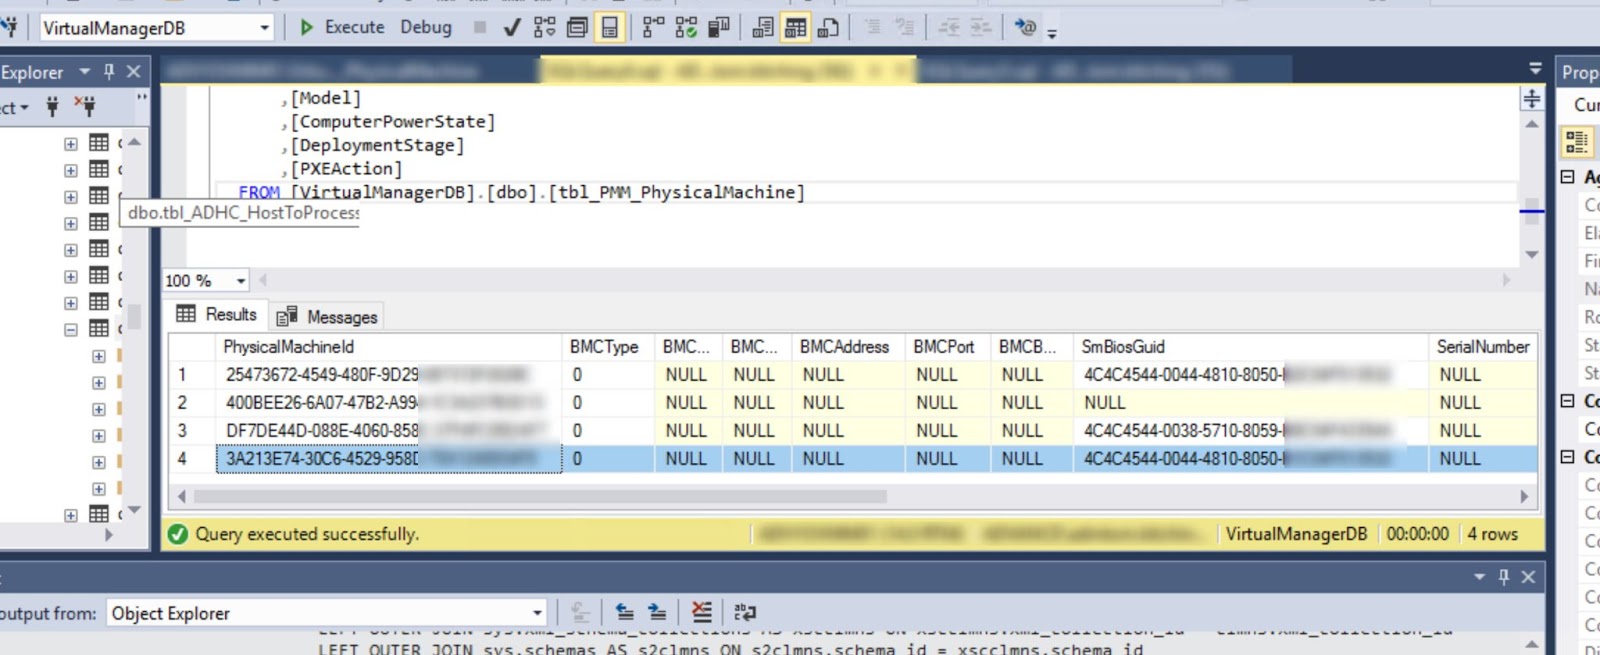
 

I exported this information to Excel (right click the grid and Save as) and matched them up getting the following:

You can see that the green and black rows match on SmBiosGuid.  By looking at the PhysicalMachineId I could see which was the redundant record (black).  Therefore I deleted this row from the PMM_PhysicalMachine table.  I did this by going to the table and choosing to edit top 200 rows (as pictured):


Then (once I had a full DB backup) I just right clicked the row I wanted to delete and deleted it.  This fixed the issue and SCVMM can now refresh the host successfully.


Wednesday, 19 December 2018

Windows 10 NLA Public vs Private profiles - what's the difference?

In a recent post I described how I used Powershell to configure a dual-homed Radius server where I wanted to firewall everything on the DMZ interface but not affect the production interface.  I did this using a Windows feature known as NLA – Network Location Awareness – which has been around in one form or another since Windows XP, although many people still know very little about it.
NLA in Windows 10 uses 3 different network profiles: Domain, Public and Private.  Windows assigns the network connection to one of these profiles when a new network is discovered.  It’s important to know the differences because this actually provides us with a really powerful tool to lock down our machines using the built in Windows Firewall.

How the appropriate location is determined

Domain

Microsoft explain that Windows checks the connection specific DNS name against “HKEY_Local_Machine\Software\Microsoft\Windows\CurrentVersion\Group Policy\History\NetworkName” (although on my test machine this was an empty key but “HKEY_Local_Machine\Software\Microsoft\Windows\CurrentVersion\Group Policy\History\MachineDomain” contained the domain DNS name).  If this matches and the machine is able to go on and contact a Domain Controller via LDAP, then you are assigned the Domain profile.

Public vs Private

This is the bit most people get confused about and it is a distinction which appeared from Windows Vista onwards (in XP the profiles were Domain and Standard).  The way that the location is determined is via the prompt that you receive when connecting to a new network ie “Do you want to allow your PC to be discoverable by other PCs and devices on this network?”.  Selecting “Yes” assigns the Private profile whilst “No” assigns the Public profile.

It’s useful to know of this distinction as it will allow you to configure specific rules on the firewall which will behave differently depending on whether you are connected to a trusted or untrusted network.

Friday, 30 November 2018

Disable inbound advanced firewall rules on public interface only with Powershell for a Windows Radius/NPS server


Recently I built an NPS server for Radius authentication, and had to dual home it with one NIC in the DMZ and one on the production network.  I wanted to firewall everything on the DMZ interface but not affect the production interface.  That way I could then allow the traffic I wanted to enable on the DMZ interface port by port.  Assuming windows has correctly detected the profile on the two interfaces as “Domain” and “Public”, which it should based on the resources visible on each network, you can run the following script to disable traffic just on the public interface.


$LogFilePath = $env:LOCALAPPDATA + "\Cloudwyse\Logs\adv_firewall" + $(get-date -Format ddMMyy_HHmmss) + ".log"

Start-Transcript -Path $LogFilePath -NoClobber


$rules = Get-NetFirewallRule

$total = 0

foreach ($rule in $rules) {

if (($rule.Profile -like "any" -or $rule.Profile -match "public") -and $rule.enabled -like "True" -and $rule.direction -like "Inbound") {

if ($rule.Profile -like "any") {

  Set-NetFirewallRule -Name $rule.Name -Profile "Domain, Private"

  write-host "Setting" $rule.DisplayName "Domain, Private" }

elseif ($rule.Profile -match "Domain" -and $rule.Profile -match "private" -and  $rule.Profile -match "public" ) {

  Set-NetFirewallRule -Name $rule.Name -Profile "Domain, Private"

  write-host "Setting" $rule.DisplayName "Domain, Private" }

elseif ($rule.Profile -match "Domain" -and  $rule.Profile -match "public" ) {

  Set-NetFirewallRule -Name $rule.Name -Profile "Domain"

  write-host "Setting" $rule.DisplayName "Domain" }

elseif ($rule.Profile -match "Private" -and  $rule.Profile -match "public" ) {

  Set-NetFirewallRule -Name $rule.Name -Profile "Private"

  write-host "Setting" $rule.DisplayName "Private" }

elseif ($rule.Profile -like "public" ) {

  Disable-NetFirewallRule -Name $rule.Name

  write-host "Disabling" $rule.DisplayName }

else {write-host -ForegroundColor Red "Error - check logs"}

$total = $total +1  }}

write-host -ForegroundColor Yellow "$total rules processed"


stop-transcript


Tuesday, 25 September 2018

Send daily HTML email with outstanding Hyper-V checkpoints with encrypted password information


Here’s a script I’ve written that can be added as a scheduled task on the SCVMM server to send a daily report to selected people containing all the currently outstanding checkpoints on the Hyper-V hosts.  This is done without having to store any plain text passwords (they are stored but in an encrypted format).  It formats the email as HTML so that it looks a bit prettier.  I could have made the HTML fancier but I wanted to keep the script simple.


$Header = @"

       <style>

       TABLE {font-family: "Lucida Sans Unicode", "Lucida Grande", sans-serif; border: 1px solid #FFFFFF; background-color: #FFFFFF; width: 750px; height: 100px; text-align: center; border-collapse: collapse;}

       TH {background: #FF0000; border-bottom: 5px solid #FFFFFF; }

       TD { border: 1px solid #FFFFFF;}

       tr:nth-child(odd) {background: #D0CFD1; padding: 3px 2px; }

       </style>

"@


$Transpath = "C:\temp\logs\snapshot_report.log"

$DateTime = (Get-Date).ToString('dd/MM/yy hh:mm:ss')

$password = cat C:\scripts\securestring.txt | ConvertTo-SecureString

$mycred = New-Object System.Management.Automation.PSCredential ("username",$password)

$Date = Get-Date -Format "dd-MM-yyyy"

$Subject = "Daily Snapshot Report from $env:computername for $Date"

$Greeting = "Good morning, please find below the daily snapshot report.  For any queries on this report please contact Tom K `(info`@cloudwyse.co.uk`)"

$ReportText = Get-SCVirtualMachine | Get-VMCheckpoint | Select VM,Name,Description,AddedTime | ConvertTo-HTML -Head $Header -Body "$Greeting $_ " | Out-String

$Recipients = 'email1@cloudwyse.co.uk','email2@cloudwyse.co.uk','email3@cloudwyse.co.uk'


Start-Transcript -Path "$transpath" -Append

Write-Host "Started running script on $env:computername at $DateTime"


Send-MailMessage `

       -SmtpServer smtpserver.contoso.com `

       -Credential $mycred `

       -From 'reports@cloudwyse.co.uk' `

       -To $Recipients `

       -Subject $Subject `

       -Body $ReportText -BodyAsHtml `

       -Port 587 -UseSsl


Write-Host "Finished running script on $env:computername at $DateTime"

Stop-Transcript


Follow the instructions here to create the securestring.txt


Thursday, 5 July 2018

Add AD security group to local administrators on Hyper-V server running core


First connect to the remote server with powershell


Enter-PSSession -ComputerName contosohv01


Next run the command to add the group:


Add-LocalGroupMember -Group "Administrators" -Member "CONTOSO\Hyper-V Admins"


If you're paranoid (like me) and want to check this worked you can use:


Get-LocalGroupMember "Administrators"


Wednesday, 4 July 2018

Hyper-V host running core - check RAM from remote server with Powershell


Here's a little script I created that was useful to check the amount of physical RAM installed on a Hyper-V server running core.  It reports the amount of physical RAM in the host as well as the amount of RAM which is actually visible and addressable to the server.  It also reports the RAM which is currently assigned the Hyper-V host OS..


Add-Type -AssemblyName PresentationFramework

$Server = "ADVYOHV01"

$PRAM = (Get-WMIObject -class Win32_PhysicalMemory -ComputerName $Server |`

Measure-Object -Property capacity -Sum | % {[Math]::Round(($_.sum / 1GB),2)})

$IRAM = Get-WmiObject -Class Win32_ComputerSystem -ComputerName $Server

$IRAM = [Math]::Round(($IRAM.TotalPhysicalMemory/ 1GB))

$CheckHost = Get-Ciminstance Win32_OperatingSystem

$PCTFREE = [math]::Round(($CheckHost.FreePhysicalMemory/$CheckHost.TotalVisibleMemorySize)*100,0)

$GBFREE = [math]::Round($CheckHost.FreePhysicalMemory/1mb,2)

$TOTALGB = [int]($CheckHost.TotalVisibleMemorySize/1mb)

[System.Windows.MessageBox]::Show("Hardware`:

`n$PRAM`GB Physical Memory `($IRAM`GB addressable`)

`n

`nCurrent OS Usage`:

`n$GBFREE`GB free out of $TOTALGB`GB total `($PCTFREE`% used`)","Memory details for server `"$Server`"")


Friday, 29 June 2018

Find number of cores on each processor for Microsoft Server 2016 Licensing


To calculate the cost of licensing for Server 2016, it's necessary to know how many cores each CPU of your server is running.  This WMI query is useful in identifying that. 


$property = "systemname", "deviceid", "name", "maxclockspeed","addressWidth", "numberOfCores", "NumberOfLogicalProcessors"

Get-WmiObject -class win32_processor -Property  $property | Select-Object -Property $property